Tuesday, 21 October 2008

Notes on configuring the MC9090G terminals

Notes on configuring the Motorola (Symbol) MC9090G terminals

1)  Install ActiveSync 4.1 on your PC. (only necessary on first use)

2)  Install the Wavelink TE Application on your PC. (only necessary on first use) 

3)  Connect CRD9000 single bay cradle to PC using USB cable, the power supply is not strictly necessary unless charging required. 

4)  Switch on MC9090G and ensure it's at the Windows desktop with no applications running.

5)  Place MC9090G into cradle, it will beep and you will see a PC screen asking type of connection, choose "No" and press “Next” button.
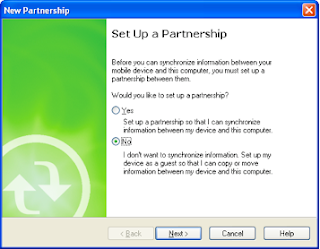


6)  On ActiveSync window there will be a button "explore"... choose this. 


7)  A Window will open showing the file system of the hand held terminal. 

8)  Double tap the Applications folder within this window.

9)  Copy ALL the files in the "Hand Held RF Terminals - files to copy to Applications folder" folder on the PC to the "Applications" folder you just opened on the MC9090G. Overwrite if prompted, and if asked to convert from PC format to Windows Mobile format, say "Yes". Now close the window showing the files in “Applications” on the hand held terminal. 

10) Run Wavelink TE application on PC .... shortcut will now (after the install) be on PC desktop. The one illustrated below is the same , however the text below the icon will read “Wavelink MC9000 Telnet CE”


11) Import desired configuration file from "Wavelink TE configs" folder on PC by choosing the Import/Export Settings button on the window as here…


Select the file from your PC that you were issued with when you initially configured the MC9090G. Then press “Open”


12) Make sure that your terminal isn’t running the TE application. It should be at the AppCenter desktop. If it is running TE then quit by pressing BLUE, then CTRL, and A keys, select Yes button (password is QUIT).

13) Press "Config Only" button on Wavelink screen.


14) Select OK when done.

15) Reboot terminal by removing battery, hold power and trigger, then release and replace the battery.

Saturday, 12 January 2008

Red Prairie Key Codes

F10 is set to ^X 0 (CTRL-X 0)
F3 is set to ^X 3 (CTRL-X 3)

VT100 emulation

# Extended Keys
0x2100 ^X 1 # FN1 Ctrl-X 1
0x2200 ^X 2 # FN2 Ctrl-X 2
0x2300 ^X 3 # FN3 Ctrl-X 3
0x2400 ^X 4 # FN4 Ctrl-X 4
0x2500 ^X 5 # FN5 Ctrl-X 5
0x2600 ^X 6 # FN6 Ctrl-X 6
0x2700 ^X 7 # FN7 Ctrl-X 7
0x2800 ^X 8 # FN8 Ctrl-X 8
0x2900 ^X 9 # FN9 Ctrl-X 9
0x2000 ^X 0 # FN10 Ctrl-X 0
0x1700 ^X ^P # UP Ctrl-X Ctrl-P
0x1500 ^X ^B # LEFT Ctrl-X Ctrl-B
0x1800 ^X ^N # DOWN Ctrl-X Ctrl-N
0x1600 ^X ^F # RIGHT Ctrl-X Ctrl-F
0xC000 ^X h # HELP_KEY Ctrl-X h
0xC000 ^X H # HELP_KEY Ctrl-X H
0xD200 ^X a # ACCEPT_KEY Ctrl-X a
0xD200 ^X A # ACCEPT_KEY Ctrl-X A
0xD300 ^X q # QUERY_KEY Ctrl-X q
0xD300 ^X Q # QUERY_KEY Ctrl-X Q
0xD500 ^X p # PRV_KEY Ctrl-X p
0xD500 ^X P # PRV_KEY Ctrl-X P
0xD600 ^X n # NXT_KEY Ctrl-X n
0xD600 ^X N # NXT_KEY Ctrl-X N
0x2000 ^X e # FN10 Ctrl-X e
0x2000 ^X E # FN10 Ctrl-X E

Monday, 10 September 2007

Wednesday, 16 May 2007

Loading Operating System onto a Symbol MC9090

Install the file "9090c50BenDC010402.exe" on your PC/Laptop.

Ensure ActiveSync is NOT running.

Connect a powered cradle to the laptop using either a serial cable or USB cable.

Start the MC9090G in IPL mode, by

Partially eject the battery

Press and hold the trigger and the power button while reinserting the battery until the MC9090 boots into IPL mode

Release the power button but continue to hold the trigger

Insert the MC9090 into the cradle then release the trigger

If you are using USB you will be prompted by the PC/laptop for a driver, point it at

C:\program files\symbol\tcm2\usb driver

On the PC/laptop

Click on "Start", "Programs", "Symbol device configuration packages", "MC9090c50 v1.4" and "TCM"

Click on the "load terminal" icon on the menu bar, you now need to download the hex files to the terminal one by one.

Browse to the "Hex Images" folder where the DCP is installed. You need to download the partition table file FIRST and the splash screen LAST, see the release notes if you are unsure which file is which.

After each file is installed you will need to reboot the terminal into IPL mode

Friday, 22 December 2006

Head cold warning on Zebra Printers

The command for this is ^MWn

Send this in any label format or make txt file as below and send to printer

^XA
^MWn
^XZ
~JUS

The ~JUS is just to save settings before turning off.

Very important switch printer off then back on again before command will work

Tuesday, 12 December 2006

Citrix ICA client - notes for MC9090G install

Trying to start the ICA client, the internet explorer opens at address http:\localhost and shows the following text:

>>>>>>>
The Windows CE Web Server is enabled on this device.

This file is a placeholder and should be replaced. Please see your Platform Builder docs or our web site at http://msdn.microsoft.com/library/default.asp?url=/library/en-us/wceinet/htm/webserv.asp.

More information on the Windows CE is available at http://www.microsoft.com/windows/embedded/ce.
<<<<<<<

What can I do to get to the main menu?


The solution is to disable the Windows CE Web Server.

In Win CE 4.1 You have to open a command prompt and then use services.exe to stop the service:

\> services stop htp0:

Where : is Shift Func R

Now the ICA client will start.

Friday, 8 December 2006

Some remap codes for MC9000 terminals, with Wavelink TE

9800:\4900
A000:\5100

This makes

Shift FUNC 6 = CTRL UPARROW
Shift FUNC 7 = CTRL DOWNARROW

And therefore they mimic the older Wavelink terminals.

The program exit key is 0029 which is ALT A

Saturday, 2 December 2006

Roll up and Roll Down on TN5250 Wavelink TE (Symbol 90XX)

These are not as in the manual, they are [SHIFT] [FUNC] 6 and [SHIFT] [FUNC] 7 and should ideally be remapped to better keys using the remap function.

Sunday, 22 October 2006

Disabling the Touch Screen on Symbol VC5090 FLT Terminals

You can disable the touch screen a couple of ways:

Firstly you can use the user programeable keys (see Prduct Ref Guide) where you can assign a function to the P1/P2 keys. One function available is disable the touch screen.

Secondly you can disable via the registry. To do this you need to create a reg key that sets the power state of the touchscreen to off.
Best way to find the key you need to alter is do a dump of the registry (using regsave tool or symscript) and look for the device driver TCH1.
In this key you should see a power state option...if you set power state to 4 it will switch the touch screen off. Create the key in notepad and save with a .reg extension. Place in the application directory and the setting will merge every cold boot.....please note you will then need to disable the calibration in Welcome.exe otherwise you will never be able to get past that window.

Cold Boot issue on Symbol VC5090 FLT Terminals


You can manually change the power setting to stop this behavior. The best thing to do would be to create a .reg file out of the following keys....

[HKEY_CURRENT_USER\CONTROLPANEL\DEVICES\CDL1:]
"TIMEOUTWAKEUPFLAG" = DWORD:00000000
"POWERKEYWAKEUPFLAG" = DWORD:00000000
[HKEY_CURRENT_USER\CONTROLPANEL\DEVICES\CDL2:]
"TIMEOUTWAKEUPFLAG" = DWORD:00000000
"APIWAKEUPFLAG" = DWORD:00000000
"POWERKEYWAKEUPFLAG" = DWORD:00000000

...and then copy that reg file onto a terminals \Application directory.
Then make the terminal cold boot, which will merge these reg keys and the terminal should be set so that if you suspend using the power button, remove power and then replace power, press the power button again the terminal should resume where it left off.

Friday, 29 September 2006

Sorting out Motorola VC5090 terminals


There are several scenarios that can happen with the VC5090 terminal. I'll try to describe each one and the remedy...

(1) The terminal re-boots and displays the "crosshairs"
(A) You must align the touch screen using the crosshairs, if you don't perform this the screen won't know where your stylus is and you won't be able to use the touch screen.
Tap the screen with something pointed but not damaging at the point where the crosshairs are located. You have to do this five times, and , at the end you will be prompted to tap the screen anywhere in confirmation.
At this point a box will appear on the left of the screen with some icons in, double tap the EXIT icon, then on the desktop, double tap the Telnet CE icon.

(2) When I tap an icon, nothing happens.
(A) The likelihood is that the screen has lost it's calibration and doesn't know where you are tapping. While you think your tapping over the right icon, the terminal thinks your tapping elsewhere.
You need to get to the crosshairs screen as per (1) above. There are two ways to do this.
The fastest way is to press the P1 P3 and POWER keys and hold for a few seconds, release the power key first, followed by the other two.
This should "cold boot" the terminal and after a minute you'll get to the crosshairs, proceed as per (1) above.
OTHERWISE.... Press the CTRL and ESC keys together to pop-up the start menu. Use the up, down and right arrows to get to the "Settings", "Control Panel". Then use the arrow keys to navigate to the icon called "Stylus", then press ENTER.

Now press the TAB key once, the RIGHT arrow once, the TAB key again and ENTER... This will end up at the crosshairs screen. Proceed as (1) until you have confirmed your calibration, then you can tap the X in the top right corner of each window to return to the desktop and then find and double tap the TelnetCE icon.


(3) The terminal is locked in some way, or behaves erratically.
(A) Press the POWER and P2 keys, then release POWER followed by P2 to warm boot the terminal.

Thursday, 24 August 2006

Appending Ctrl-S to the data from an Caere Easy Scanner 2033A


What we do is enable the barcode reading with EDIT required.
We then edit the barcode data and can control the output.

Are they all the same code, ie Code 39?
Or could the special barcode be a different code 128?

I need to know what codes they are reading.
for instance code 39.

//192//DFIJ
This command requires that all Code 39 data must pass an edting "D" field.
192 = Code 39
A = Enable with Edit Required
F = Full ASCII
I = CD xmit off
J = Field Accumulate Off

In our editng parameters:
D Fields define an input picture
U Fields output Processing
Data gets passed to the editor in order D1, then D2 etc.
If it passes the Input edit it gets processed, if not then the next field.

a simple edit field.
/D1/002/"ZZZZ"/
/U1//0RX1498F014X
/D2/002/44R/
/U2//4RX5AX/

D1 define Field 1, 002 Use output processing
"ZZZZ" input data must be literal "ZZZZ"
U1 define Output Processing for D1
0R 0=Suppress R=Repeat
X1498F014X insert hex value
14h Make Left CTRL Key
98h S
F0h Break
14h Left Control Key

D2 define Field 2, 002 Use output processing
44R Require 4 Anything, R repeat
U2 define output processing for D2
4R=Output anything, R=Repeat, Insert 5Ah (CR)

In the above example data ZZZZ meets edit D1 and gets processed pper D1.
Suppressed and Left CTRL is inserted.
Anything other then ZZZZ wil meet the D2 field, data sent with A CR postamble.

I need to know from you the following and I will send you a program you can load into a 2033.

The special Barcode to trigger CTRL S
Do you want the LEFT CTRL Key or the RIGHT.
What Code you will be reading.

Saturday, 24 June 2006

Windows CE 5.0 and RF regulatory issues

The issue with the RF profile not working sometimes, might be down to the incorrect "regulatory" information being set on the terminal.

If you tap the signal strength icon in the bottom right of the display you get a menu.

Select Options and you'll get a dialogue box.

Select from the drop down "Regulatory".

Ensure country is set to UK and the "Enable 802.11d" check box is NOT selected.

Then SAVE and exit this.

*** However this is NOT saved in flash memory and is lost when the device cold boots. The fix for this is as follows ...

After performing the above, repeat it with differences as follows ...

Tap the signal strength icon in the bottom right of the display you get menu.

Select Options and you'll get a dialogue box.

Select from the drop down "Export".

Then press "Export Options" button

Then select "OK" (do not change default names or folders, just say OK)

Now, and in conjunction with RegSave, *ALL* options of the 9090 are saved to persist through a Cold Boot.


Then back in the original menu ...

Select "Manage Profiles"

Choose the desired profile.

Hold the stylus on the profile text for a second or so, when the menu appears, select "Connect"

Now exit the profile manager menu back to the main desktop and double tap the "Wavelink TE" icon.

Thursday, 27 October 2005

RegSave on Symbol 90X0 terminals, specifically the 9060 with the 802.11b RF option


Some brief notes about the use of RegSave on Symbol 90X0 terminals, specifically the 9060 with the 802.11b RF option.

You will need RegSave_2_53_04.zip

Unzip this and locate the file RegSaveCED.exe in the 9050 folder.

Connect your terminal as a guest in ActiveSync and explore it using Win Explorer. Locate the c:\applications folder and copy the RegSaveCED.exe file to this folder on the HHT.

Now you can uncouple the HHT and click start menu and Windows Explorer to look at HHT's local files. locate applications folder and locate the RegSaveCED.exe file... double tap

Now screen RegSave EMEA TS appears.

In Registry section press "Create Template File"
Accept \Application\RegSave.tpl option offered
Click Create template and wait forever !

............. time passes ..................

The app rattles through all the registry entries and builds a file with them all in. Just when you assume it'll last forever it stops...

Now back to the main screen ...

Click OK (top right) to exit the app

--- oOo ---

Now set your IP parameters and RF bits... in fact anything you need.

........... time passes ...........

--- oOo ---

Now re-load the RegSave app.

Press the button in the Registry section entitled "Save Current Configuration"

I got some missing file error here which I rode over roughshod... basically it's looking for a registry exception file. You can create this but and it can be a list of ignored keys but for our purposes it doesn't matter so I just said "Yes"

It'll do some stuff regarding comparing and checking for differences, then it saves the changed bits.


Now you can exit RegSave and try rebooting... it should have saved the changes to the Registry and everything should be the same as before.

Thursday, 15 September 2005

Zebra Serial Cable 9-9 pinouts

Here are pinouts of Zebra Serial Cable 9-9 for reference 

9 pin female end / 9 pin male end

1 W / Black 
2 G / R 
3 R / G 
4 Y / Blue 
5 Bare (shield wire) / Bare (shield wire) 
6 Blue / Y 
7 W / Black 
8 W / Black 
9 n/c / n/c 

n/c = no connection 

At both ends pins 1,7 and 8 are connected together and not to anything else.
Pins 2 and 3 cross over between the ends
Pin 4 and 6 cross over along the cable
Pin 5 is ground and the cable sheath wire is used for this.

Wednesday, 29 June 2005

REA Scancheck II - Screen Contrast

Some users complain of reduced screen contrast or even the screen going either blank or totally blue. This is not a fault!
Screen contrast is changed by pressing the up [8] and down [2] keys when the display is at the main start-up menu.


It sometimes happens when inexperienced users randomly pressing keys!

Datalogic Gryphon D100 Scanner Setup

These scanners come with a quick reference guide to set them up out of the box.
They are very simple to set-up, however the one part that always gets missed is setting the keyboard to a 'make-break' type.
So most set-ups consist of scanning the following barcodes :
Reset to Factory Defaults
Wedge : PS/2 PCs (usually but may differ depending on host device)
Key Transmission Mode : Make-Break keyboard

This is all that is needed to get the device working. However if they wish to set-up barcode types that aren't set as default code types you will need the Full reference manual (available on the Datalogic web-site or from me).

Quick reference and full manual


I mention this as EAN 128 codes are not set as default.

Monday, 13 June 2005

Certification of ISO Compliant Barcode Verifiers planned for UK

UCC product certification

In the UK we have a GS1 UK solution provider programme, but we do not currently extend the service to product and service certification.

Some of our solution providers have raised an issue with verifiers where they feel that some verifiers even though claiming to meet ISO standards do not comply with the standards as manufacturers certify themselves. As we encourage all our members to use ISO-compliant verifiers when producing bar codes, some are unknowingly buying non-compliant equipment.

GS1 US seems to be carrying out independent certification of verification equipment in the USA as part of their solution provider programme. We have requested more information about this so as to see whether it is something that can be extended to the UK.

The following two paragraphs have been copied from the GS1 US website and the information will be updated when more information has been received from the organization.


How is the certification testing being facilitated?

The UCC Solution Partner Program works with best-in-class certification agents to provide testing services for certifying products and services. The UCC internally tests hardware and software for the EAN.UCC Program Area and conducts training and testing for all consultant certifications.

Technology changes rapidly. How long is a UCC Solution Partner certified? Is certification indefinite, or is there a re-certification process?

Hardware and software is typically certified by version of the standard product or service that it is being certified against. As long as the version is an active version, a certification will stay valid. But as versions of standards, products or services progress, the UCC Solution Partners are encouraged to stay current with newer certifications.

Saturday, 4 June 2005

North America to accept 13-digit bar codes from 2005

Do you intend to sell your products to Canada or the United States next year? From January 2005 there will be no need to use 12-digit bar codes because all North American retailers should be able to handle EAN-13 bar codes as well.

At the moment any e.centre member who trades in North America is advised to use UPC-A bar codes because many retailers cannot record 13-digit global trade item numbers (GTINs) in their systems.

But the Americans are conscious that they are running out of these 12-digit numbers to use as bar codes and in 1997, the Uniform Code Council launched its Sunrise 2005 project. This project aims to ensure that all American companies make the appropriate changes to their systems and build in the ability to handle GTINs that are up to 14-digits long by 2005.